The Influence professional software allows users to record temp bookings and then record time sheet information. Once entered, this time sheet information can be exported to MS Excel or to a payroll system for invoicing or further analysis.
Contents (Click an item to Jump to that section)
TABLE OF CONTENTS
- Where to Find Timesheet Entry
- Navigating the TIMESHEET ENTRY screen
- ENTERING TIMESHEET INFORMATION
- Storing Scanned Timesheets.
- Exporting Timesheet Information
- Export to Tempaid
- Export to Tempest
- Export to Lloyds
- Confirm Timesheets to Client
- View Clients with Timesheets
Where to Find Timesheet Entry
Newer systems running the Temp Centre will have a separate workbench at the left of the system, labelled [Timesheets]
On older systems the Time sheet entry screens can be found on the [Bookings] workbench. At the bottom left of the [Planner] screen the [ TS ] button will open the Time sheet Entry screens.
Navigating the TIMESHEET ENTRY screen
When you open the time sheet entry screen you will be presented with a list of bookings from the previous week.
You can adjust the week displayed using the Back / Forward < > arrows.
It is possible to select Entered / Unentered / ALL time sheets using the radio buttons () at the top of the screen.
The tick boxes [ ] allow users to choose to see Pay Rates, charge Rates and Sundries in the gird.
To filter the displayed data to see the time sheet information for a specific worker or company you may either
a) Right-Click on the desired information in the gird and choose Filter
b) Use the Company/Contact/Worker filters at the top left.
Ability to Freeze Columns within Timesheet Entry
From v1.00.23.240 or later.
A new feature has been introduced to allow individual users to control the number of Fixed Columns within the TIMESHEET ENTRY screens. Scrolling right will leave a certain number of columns 'Fixed' whislt the others slide behind them.

The number of columns that are fixed by default, is controlled with parameter TEMPS, INTEGER(1)
The ability to edit the number of columns is controlled with parameter TEMPS, PRIORITY(2) - It is also possible to linka UAC (User Acess control) to this parameter to define a specific list of users that can do this, rather than rely on priority.
Filter Timesheet Entry based on Parent Organisation
If using the Parent/Subsidiary feature, then the TIMESHEET ENTRY module allows the timesheets to be filtered based on PARENT. Simply select the Company as the parent organisation and then choose the 'Branch' as All Subsidiaries.

You will then see the timesheets for any companies set as subsidiaries of that parent organisation.
Tip: This is often useful in healthcare scenarios where Trusts are set as perents, and hospitals and treatement centres are organisations under the parent Trust.
| NOTE: The Parent/Subsidiary feature can be enabled in the database with parameter REC, Flag(49) - Enable Parent/Subsidiaries on Clients |
Filter Timesheet Entry based on Booking Owner
When viewing timesheet entry it is possible to filter the displayed bookings/timesheets based on the Booking Owner.
From v1.00.25.170 (or later) it is possible to see/display the Shift Owner
When filtering by Book Owner, the system will include any bookins where the Shift Owner matches the selection as well.

ENTERING TIMESHEET INFORMATION
There are 3 basic methods of timesheet Entry:
- Using the COMBI SHEET (this is the best and most flexible option.)
- Using 'WEEKLY' Entry (this is an older method and can now be done using Combi sheet.)
- Using Individual Entry (more time consuming as each day is entered separately)
IMPORTANT: Change to the way the system works, from version 1.00.23.225 onwardsAt this point, a change was made that affects how the system works when using the 'Combi Sheet' to enter timesheet Information. Parameters that affect this: PAYROLLB, flag(3) - Group by Booking ID on weekly TS This was originally being ignored by the Combi Sheet. We have now corrected the 'Bug' which is what has led to the new behaviour. To return the system to how it used to behave, make sure this is "Un-Set" PayrollB, Flag(5) - New Bookings always get new Group This flag is now 'correctly' taken account of (after release 1.00.23.225 or later) - so it is possible to 'force' each booking to get a new Group_ID (or ensure that similar bookings within the same week get the same Group_ID) [This may not be needed or wanted, but is mentioned here for completeness] Please be aware of this change if the way Weekly Timesheet Entry works has changed following an update, when using the Combi-Sheet. You may also want to consider TEMPS, Flag(20) - Separate unfilled bookings from Planner. The default is to leave this unticked, so similar unfilled bookings in the same week will get grouped together and given the same Group_ID (i.e. those for the same role, client. contact & shift) If ticked, then these similar unfilled bookings will each be given a new Group_ID. |
Combined Time Sheet Entry (Combi Sheet)
| NOTE: This feature (Combi sheet) will only work if using Rates v2 Systems on earlier version of Rates will need to be converted to Rates v2 before the Combi Sheet can be used within TIMESHEET Entry. |
Newer systems (after 1.00.16.354) have the ability to use a combined entry sheet which allows entry of either a weekly total or individual daily hours.
This method of entry also allows for the recording of POA Hours (Periods of Availability) which is particularly useful for driving and transport based workers. In particular it is necessary to record these hours to accurately ensure compliance with the driving regulations and ensure the system can accurately enforce maximum driving hours when making new bookings.
The 'Combi Sheet' is opened by clicking the small icon in the T/S column.
Once clicked the system will open up the Combined entry sheet for the selected worker.
The combined entry screen will show a summary of the bookings for the chosen worker for the selected week.
| NOTE: If you have selected a range of more than one week on the main Time Sheet entry screen, then the combined entry form will relate to the first week in the range. (Date is shown in the 'Week commencing' field) |
On this form it is possible to enter;
- The start/end times for any particular day and mins. break.
- The amount of hours of Basic/Overtime/Sat/Sun (plus any other rates) for each day.
- The total weekly hours of Basic/Overtime/Sat/Sun (or other rates)
- POA hours (periods of availability, for drivers)
In the case of entering the total weekly hours, the system will try split the hours evenly across the working days.
The [Adjustments] button allows users to record 'adjustment' payments, These can include things such as Lunch allowances, Bonuses or other Sundry payments. It is also possible to record items which are charged but not paid, or paid but not charged using this feature.
Weekly Time Sheet Entry
Sometimes it is easier to enter Time sheets using the [WEEKLY] button. This allows users to run through each worker sequentially and enter the total hours that they worked that week, then move on to the next one. This is particularly useful when entering a batch of timesheets from a particular company, for example.
In the example above the Time Sheet entry screen has been filtered to a single company (Big Machines) and then the [Weekly] button was clicked. It is now possible to enter the total hours for a worker for BASIC, Overtime, Saturday, Sunday (or other rates which have been setup on your system) The Pay/Charge rates will pull through from the original booking entry.
Users should enter the figures, then press [Apply] followed by [Next] to move through the list and enter all the time sheets.
This is a good option where the ACTUAL hours worked each day are not important, but the total weekly hours are needed to ensure the worker is paid the correct amount for the week. It can be quicker for large batches than the individual option.
Individual (Daily) Time Sheet Entry
To enter the time sheet information simply select a row and amend either the Start time, End Time or the Hours (Basic, Overtime, etc)
If the HOURS do not add-up to the same as the times, then the row will turn red to indicate a mismatch.
Placing a number into the Timesheet No. [ ] field at the top centre, and then clicking on a row will set the time sheet number for those entries. (e.g. A worker sends his time sheet information to you on time sheet 367, set 347 in the field, then click on his rows.)
| NOTE: On some systems the software has been configures to automatically set the time sheets number to "1" once time sheet information has been entered - this will then be changed to the next sequential number by the system when the time sheets are exported as a payment run. |
(This process is sometimes used when exporting to a 3rd party payroll system to ensure that time sheet numbers are kept unique, if these numbers are provided to you.)
Storing Scanned Timesheets.
From version 1.00.18.217 (or later) is is possible to Drag/Drop a scanned timesheet file onto the COMBI-SHEET during timesheet Entry. The file will be stored in a folder called BOOKINGS and can be seen on the [Docs] tab of the relevant client record. (see below)
Combi-Form (Timesheet Entry)
Docs tab of client record showing stored documents.
After Version 1.00.20.085 It is possible to see/stores multiple documents against a Timesheet.
Any time-sheets which have stored/saved documents will have a icon shown at the right hand side. Clicking the paperclip will open the [Booking Documents] form.
On the Booking document for you can:
-Drag/Drop other documents to store.
- Tick Selection Mode [ ] - choose several document and then use Zip Selected to make a zip file containing the chosen documents.
- Use the New Folder button to make a new folder, then store document within that.
File names
THE file names of the Timesheet Docs uploaded depends on the first date you have selected in the Timesheet Entry Date Filters.
You will not be able to see 'Timesheet Docs exists' if you have open a Combi Sheet with the date range filter set to the week start 'i.e Monday' if when you dropped the documents on TS entry the first date in the filters was something other than the first Monday of the booking. You would only see 'Timesheet Docs exists' otherwise if you then amend the TS entry filters to start at the date that matches the prefix of the filenames.


Exporting Timesheet Information
Once the information has been entered into the system, it is possible to export the information in a variety of formats for analysis or import into a payroll system or suchlike.
Use the selections at the top of the screen to filter the information until is shows the items you are interested in exporting.
(e.g. Only Entered Timesheets between 06/02/2017 - 12/02/2017 at big Machines only.
Then click the [Export] button at the bottom left.
| NOTE: Newer systems after v1.00.17.019 have the ability to warn if there are timesheeted items which are un-exported from previous weeks to ensure that payments are not missed. |
Having chosen to export the on-screen information the system will show a pop-up box where users may choose the type of export they wish to perform.
Certain formats such as Tempaid, Reed and Tempest are fixed and not changeable by the user. Others such as Excel allow the user to specify which information should be included in the export.
| NOTE: These formats are designed to work with specific 3rd party products - if you have one of these products then you will need to check if your version uses a compatible format.) |
Having chosen an export type, users can tick if it is a payment run, or Invoice Run (or both)
Ticking these options will flag the record in Influence as having been Paid, or Invoiced (or both) as appropriate.
This is particularly useful if these figures are being passed to a payroll system, and once ticked the figures in Influence will be "Locked down" and no longer editable. (Since these then become the actual figures which were passed to payroll)
| From version 1.00.25.179 or later Access to the Payment Run [ ] / Invoice Run [ ] tickboxes can be controlled and restricted to specific users only. Parameter Payroll, Priority(2) controls this can can be restricted to a specific list of userIDs using UAC (User access control) linekd to the parameter. |
Export 'All Offices [ ]'
(Feature available from version 1.00.23.138)
Within the TIMESHEET ENTRY screen, for systems that are Multi-Office it is now possible to display timesheet records from "All" offices rather than simply the 'selected' office as displayed at the bottom of the screen (See below)
The new feature is activated with parameter PAYROLLB, Flag(32)
Export to Excel
Using a Template
If you have chosen Excel as the export method you can use the Template: drop-down to select a specific excel template. The system will then prompt for a file location for the export and produce a *.csv file.
Having produced the *.csv file the system will open the file location automatically so that the export can be opened with MS Excel.
No Template
If you have chosen Excel as the export method but have not specified an export template then the system will display a screen with a choice of columns.
Place a tick the items of information which you wish to be included in the export file.
Export to Tempaid
If you use TEMPAID as your Payroll processing system, it is possible to export details from the system in a format that can be imported into TEMPAID.
The system will produce 3 files; A 'timesheet' export file, a 'client' export file, and an 'employee' export file. The files will be saved into the selected folder/directory.
| REC??CLN.dat | This is the file that contains the Client information. ?? is replaced with the 'CompanyID' e.g. N4 |
| REC??EMP.dat | This is the file that contains the Employee information. ?? is replaced with the 'CompanyID' e.g. N4 |
| REC??TIM.dat | This is the file that contains the Booking/timesheet information. ?? is replaced with the 'CompanyID' e.g. N4 |
Export to Tempest
If you use TEMPEST as your Payroll provider, the system can export files in a format suitable for import into Tempest. The process and files are almost identical to the Tempaid export specified above.
Export to Lloyds
If you use Lloyds bank online banking, it is possible to produce a specific layout top be used with their systems.
Upon choosing Lloyds as the export type, users will be able to specify a file location (Export Path) and can then choose from several pre-defined formats for the export file.
The system will produce a csv file (comma separated) suitable for import into the Lloyds system. (Example shown below)
Confirm Timesheets to Client
It is possible to use the TIMESHEET ENTRY option to send timesheet confirmations to clients, for them to approve. The feature works as below;
STEP 1
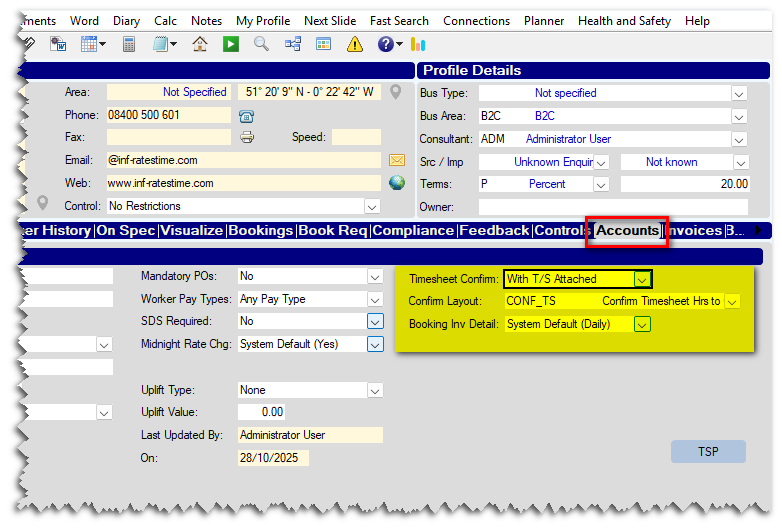
On the [Accounts] tab of the client, you can indicate if this client requires timesheet Confirmations (or not) and also select a specific Excel layout for that client (if you have multiple layouts)
NOTE: On newer systems (v1.00.25.290 or later) there are options to attach any stored timesheets, and send them as a *.Zip file along with the confirmation email.
STEP 2
Within TIMESHEET ENTRY, enter the timesheet information as you normally would and (optionally) Drag/Drop physical copies of completed timesheets onto the 'Combi-sheet' for the worker to store the timesheet itself.
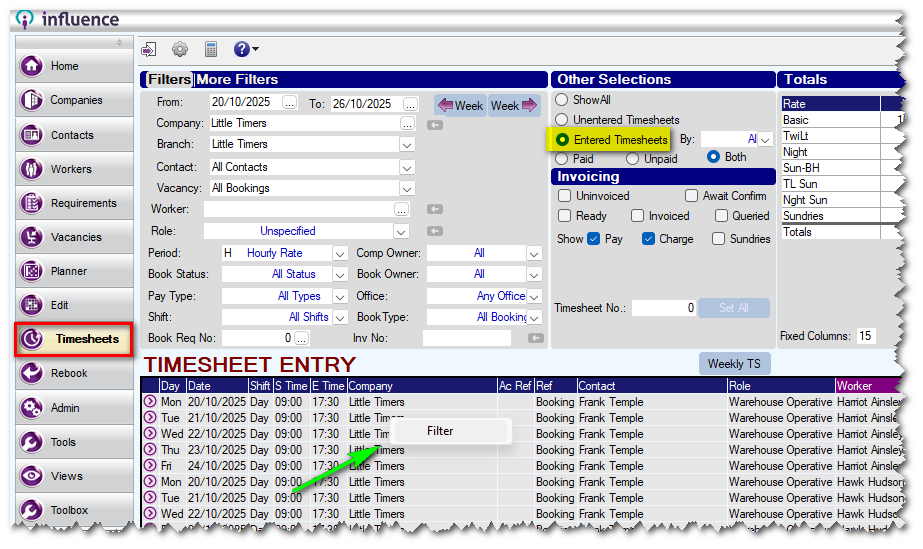
Having entered the timesheet information, search for Entered Timesheets and then Right-Click on a Company to filter the display to the selected company only.
STEP 3
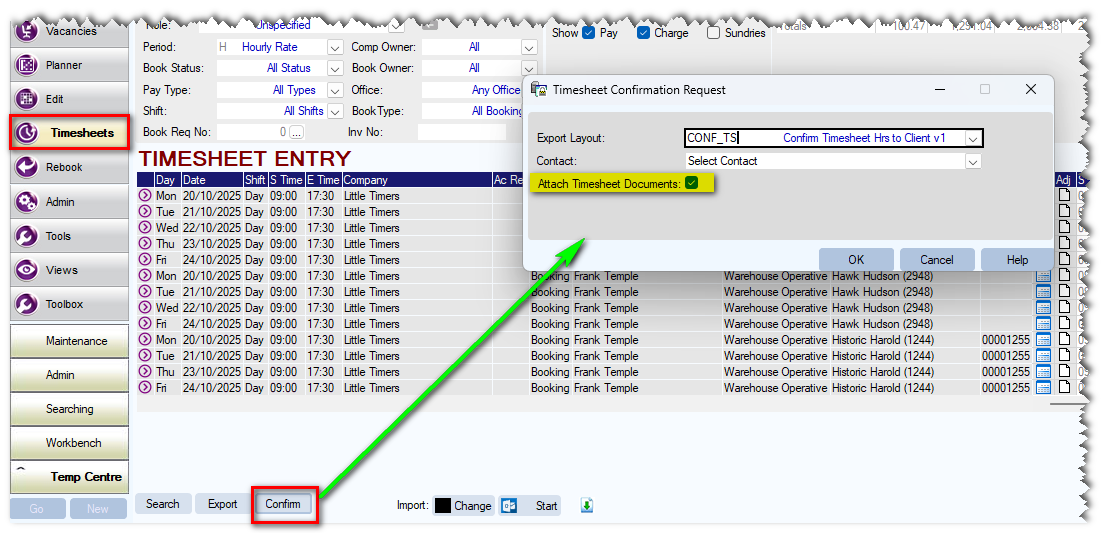
Having selected a single company, click the [Confirm] button at the bottom left of the screen. The system will display a small window for you to select the Excel layout you wish to use to send the hours, and to select the contact whom you wish to email. Click [OK]
Optional - You can choose if you wish to attach and stored timesheets as a *.Zip file. (only available after v1.00.25.290 )
STEP 4
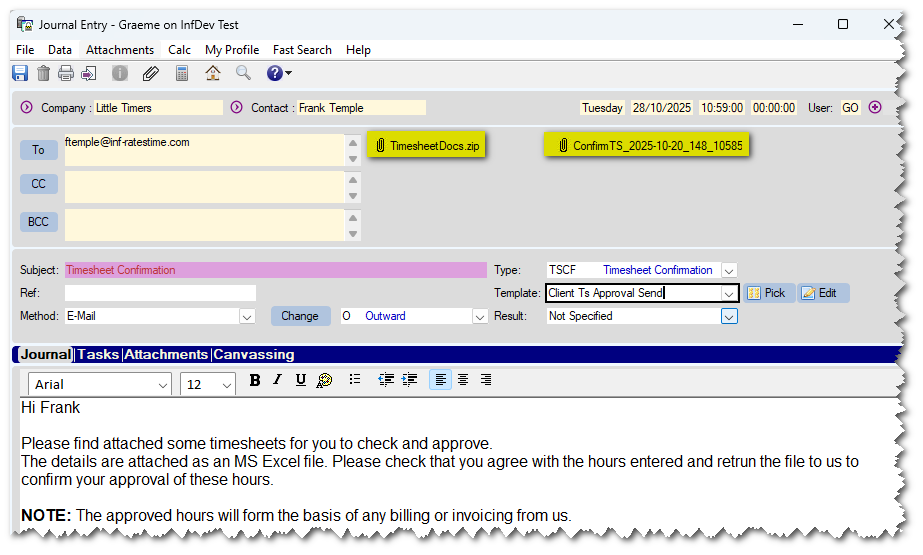
The system will display the Excel sheet, which can be saved/closed. It will then open a Journal Entry screen. Simply pick the email template you wish to use - the system will automatically attach the Excel sheet (and the *.Zip file of timesheet documents if selected previously.)
Simply click [OK] to pass the email to MS Outlook, and then send the email as normal.
System Setup / Parameters for Timesheet document attachment (as *.Zip)
As mentioned above, on newer systems (those on version 1.00.25.290 or later) have the option to set the system to attach copies of any stored timesheets. These will be attached as a *.Zip file to the email confirmation that is sent.
PARAMETER(s)
RECD Flag 30 - TS Confirm Req (with Attach/Possible Attach)
This parameter has options of Y,N,A,P
Y (Yes), N (No), A (Attach) or P (Possible Attach) which control the default option on clients for how the confirm feature should behave.
Example Timesheet Confirmations
Weekly Hrs Summary (Timesheet Confirmation):
Timesheet Confirmation per Client - Subtotal by Worker
These layouts above can be imported into your system as follows.
- Download the relevant *.XML file attached to this article. (Scroll to the bottom of the article to see files
- Login to your Influence database as a high-priority user (such as ADM)
- Go to Maintenance > Temp Centre > Setup > Timesheet Export Layouts
- Once the option opens, click [IMPORT] at the bottom left, then drag/drop the *.XML file onto the system.
View Clients with Timesheets
[From version 1.00.25.295 or later]
It is possible to run a search from the 'Companies' workbench and produce a list of any companies with entered timesheets in a selected date range.
e.g. Below is a view listing companies with entered timesheets from 'Last week'.


Was this article helpful?
That’s Great!
Thank you for your feedback
Sorry! We couldn't be helpful
Thank you for your feedback
Feedback sent
We appreciate your effort and will try to fix the article