From version 1.00.21.045 (or later) it is possible to send confirmations of entered timesheets to clients from within TIMESHEET ENTRY.
The idea is that from within the TIMESHEET ENTRY screen, users can key-in details of the hours worked, and then send a summary of all the entered hours to the client for them to approve prior to exporting the information to any payroll or invoicing packages.
Contents (Click an item to jump to that section)
TABLE OF CONTENTS
- Contents (Click an item to jump to that section)
- Provisos & Caveats when Using Timesheet Confirmation
- Example Files
Parameters / System Setup
The use of the confirmation feature is controlled with some parameters
| NEW PARAMETERS | DETAILS |
| RECD Flag (30) | - Default TS Confirm Required on main site (1=Wk1) If set to Y then new clients will automatically be set to require Timesheet Confirmation (1 will set this to indicate that they require confirmation of 1st week only) |
| TEMPS Text (19) | - Call type for TS Confirm to Client email. Whatever CALL TYPE is specified here needs to be added to the Call Type [019] Code Table |
| Optional Parameters | |
| TEMPS Flag (25) | - Use Invoice Billing Status If this is turned on then Billing statuses are shown in the TIMESHEET ENTRY screens. |
| TEMPS Text (20) | - OK to Invoice/Pay Status (NCRQY) - Default is R (i.e. Ready on both) - Use "/" if different status between Invoice and Pay |
Before you can use the feature, you will need to prepare your system as below.
i) Setup Clients
You will need to go through all of your active clients (i.e. those who place bookings with you) and decide if they wish to have Timesheet confirmations sent.
Go to the [Accounts] tab of the client record and use the drop-down to select whether Confirmations are required (Yes/1st Booking Only/No)
| Optional - It is also possible to specify the DEFAULT export layout which will be used for this client. If no default is specified, then users will be given the choice of all layouts at the time of generating the confirmation. |
ii) Setup the Call Type
You will need to specify a Call Type to be used for the confirmation emails, using parameter TEMPS Text (19). Whatever call type has been specified needs to be added to the Call Types [019] code table if it does not already exist.
To add a new CALL TYPE, Login as ADM (or any other high priority userID)
Go to Maintenance > Setup > Code Tables.
Select System Area = C (Contact Management), then choose Call Types [019] and add a new type, to match whatever was set for the parameter. (e.g. CFTS)
You can then create an email template, using that Call type, which will be used for the confirmation email.
How to Use Timesheet Confirmation emails
Using the Confirmation emails is really simple, and can be explained in three steps.
Step 1
Within TIMESHEET ENTRY filter the records to show a single client.
Provided the client has been set to requite confirmations you will be able to click the [Confirm] button at the bottom left.
You will then be prompted to select an Export Layout and choose a Contact.
{The drop-down list of contacts will exclude anyone who has LEFT or MOVED to another comany}
| NOTE: From release 1.00.26.170 or later, it is possible to show additional info when displaying the Contact in the drop-down list. You can specify which additional info is shown using parameter RECF, Text (12) and can choose multiple items from Phone, DDI, Mobile, Role, Importance 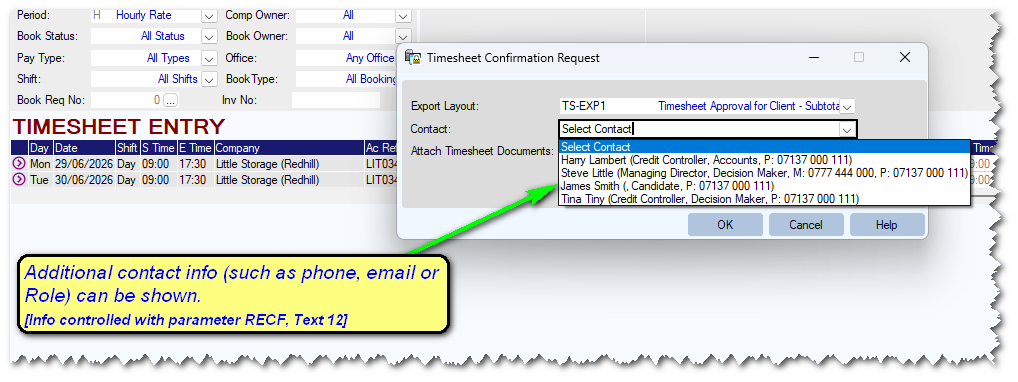 |
Step 2
The system will then generate and open the chosen export format using MS Excel. A typical example is shown below listing each worker, the TOTAL hours they have worked, and the number of hours on each day.
Users should check the export, then close the excel window.
| NB: The Custom Timesheet export format which generates the output above is attached to this article, and can be downloaded and imported into your database if required. |
Step 3
The system will now open an Journal (email) using the specified CALL TYPE. The template will attach the excel sheet generated in Step 2 and set the recipient to the chosen contact.
Pressing [OK] will pass the email to MS Outlook to be sent and also record a copy in the database against the relevant contact.
Provisos & Caveats when using T/S Confirmation
The following information should be taken into account when using the confirmation system for Timesheets.
a) It is only possible to confirm timesheet information to a single client at a time, and so you must filter the TIMESHEET ENTRY screen to display records from one client before confirming them.
b) The [CONFIRM] button will only be offered as an option *IF* the client has been marked as requiring confirmation using the [Accounts] tab of their record.
c) If you have activated Invoice Billing Status then it will only be possible to confirm ENTERED Timesheets.
The feature is activated with parameter (TEMPS, Flag(25))
See below for example of Invoice Billing Status fields.
These tick boxes can be used to filter the displayed timesheet records and work in combination.
i.e. Ticking Uninvoiced [ ] and Await Confirm [ ] will display timesheet records at either of these statuses.
Furthermore, if you have activated Invoice Billing status then the act of sending the Timesheet confirmation email (when passed outlook) will set the status of all included lines to Confirm indicating that the confirmation has been sent and is awaiting reply from the client to confirm the figures are all OK.
Example Files
Attached to the bottom of this article is an example file that can be used as the Timesheet Confirmation.
The file Weekly_TS_Confirm_(Summary).xml can be imported into the system in the following way.
- Download the attached file Weekly_TS_Confirm_(Summary).xml
- Login as the UserID ADM
- Go to Maintenance > Temp Centre > Setup > Timesheet Export Layouts
Once the the screen opens, drag/drop the downloaded file onto the screen and follow the prompts to import the file.


Was this article helpful?
That’s Great!
Thank you for your feedback
Sorry! We couldn't be helpful
Thank you for your feedback
Feedback sent
We appreciate your effort and will try to fix the article