This guide is designed to explain the process for adding a new temporary booking to the system.
NEW CONTENTS LIST
TABLE OF CONTENTS
- OVERVIEW
- 1. Candidates/Workers
- 2. Making Bookings
- 3. The Booking Entry Form
- 4. Selecting or Shortlisting a Temp
- 5. Compliance items with Bookings
- 6. Confirming Bookings
- 7. Viewing Bookings
- 8. Bookings Maintenance
- 9. Changing the Branch for a Booking (Unallocated Branches)
OVERVIEW
The Influence Professional software allows users to easily book Temporary workers at sites. The system will allow users to enter bookings, will helpfully suggest likely workers to use, based on the fact that they have worked at a site or company before, and then allow users to send confirmations (emails) to both the client and the worker.
Once the booking has been completed the system allows users to enter details of the actual hours worked via a Timesheet Entry system. These details can then be exported into excel so they can be imported into 3rd party systems such as payroll software.
1. Candidates/Workers
In order to make bookings you will need details of candidates (workers) registered in your system. You can record details for these workers such as Names, addresses, contact details, as well as what Roles they are looking for. You can also store compliance documents for each worker including Right to Work, Proof of ID and other certificates or paperwork that they may need in order to be able to work.
Registering a Candidate as a Temp Worker
Anyone who is registered and wishing to work as a Temp should have the Temp Work flag ticked on their candidate record. This is recorded on the [Requires] page of their record.
Workers flagged as looking for Temp Work will appear on the PLANNER and will also appear when looking for Suggestions to fill a booking.

As well as indicating they are looking for Temp work, you can indicate if thyey are interested in Permanent Jobs, and/or contracted. You can also record if the worker is a STUDENT. Workers flagged as Students will display a warning if you try to book them for more than 20Hrs during a week.
Recording Compliance for a Temp Worker
For workers registered in your database, you can record or store various Compliance items. These are typically items such as a Right to Work, Proofs of ID, plus any licences or certifications needed for certain jobs, such as Driving licences, DBS certificates, Vaccinations or Training courses, etc.
To record their compliance details go to the Compliance page of their record. You can then Drag/Drop items onto this page into pre-defined slots and complete details such as Issue dates, Expiry dates, etc.

Once you have stored all the relevant paperwork and completed the necessary compliance items, you should set the candidate status to LIVE to indicate they are registered and available for work.
FOR MORE INFORMATION ABOUT ADDING AND USING COMPLIANCE PLEASE SEARCH OUR HELP SYSTEM FOR 'COMPLIANCE'
2. Making Bookings
Once you have some Temp workers registered in your system, you will want to make bookings. There are several ways to make bookings via the system - there is no right or wrong way, but sometimes one way is more suitable or easier than another, depending on exactly what you are trying to achieve.
i) Making bookings from the Client record
Go to the company record and choose the [Bookings] tab. You can use the From/To date fields to see bookings at this client between the chosen dates. To make new bookings click the [Book] button.

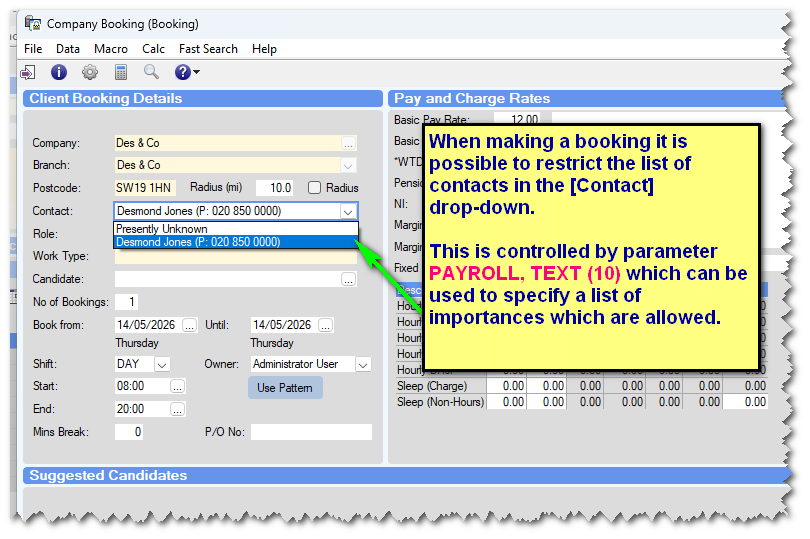
The system will display the bookings screen. You can choose a Contact (who made the booking) a Role (the type of work/worker), and the dates of the bookings (From / To ) as well as the Start/End Times.
From v1.00.25.090 or later the Information displayed in the Contact dropdown can be customised. You can choose to show Telephone, Mobile, DDI, Role, Importance. This is controlled with parameter RECF, Text(12) |
On the booking screen below, just enter the details for the booking. (Contact, Role, Shift, Date, Time & Break.)

The system will show a list of “suitable” candidates in the lower half of the screen. To choose one of these simply tick in the Select column.
Alternatively, you can choose a totally different candidate by typing their surname into the Candidate: field at the left, and then clicking the 3-dots to search for the candidate.
You may also select a start time/end time for their booking, and the minutes of unpaid break that they are allowed. You can also set the Basic Pay/Basic Charge Rates at the top-centre of the screen. {These are usually pulled from the client if you have setup Rate cards on that client for this Role.}
Once happy with your selection, click the [Book] button to create the booking(s).
| NOTE: It is possible to create a booking with no candidate specified, and then decide who will do the booking at a later date. This will create an unfilled booking on the system. |
ii) Making bookings from the Candidate (Worker) record
If you know which worker you want to use, and which client you wish to book them into, it is sometimes easier to make bookings via the Worker record.
Open the worker record and choose the [Bookings] tab. You can use the From/To date fields to see bookings for this worker between the chosen dates. To make new bookings click the [Book] button.

The system will open the Booking Entry window similar to before, and you can then select a company/branch, the contact they are working for, Role and the dates/times of the booking.

Bookings that have been made for this worker can be seen on the [Bookings] tab of their record, for the selected date range

It is possible to open the details of a specific booking using the Navigator (>) at the left hand side of the bookings themselves.
iii) Making bookings from the Planner screen
Similar to the two previous options, you can make bookings from the [PLANNER].
Using the Planner you can search for workers and/or companies and display details of existing bookings week-by-week.
Within the TEMP CENTRE, select the Planner and use a combination of filters and tick boxes to find the worker(s) that you want. (NB: On older systems, there is no TEMP centre, and the Planner can be found within the [Bookings] workbench.)

To Make a Booking from the Planner
Choose the option [BKD] from the palette below the planner, then click on the cell for the Day/Worker that you wish to book. (e.g. Tue 20th Feb, Simon Stacker )
The system will then open up the Booking Entry form similar to the other methods. The worker will be pre-selected and you can then complete the rest of the booking form. Choose the Company, Contact, Role, Dates Start/End Time and set or adjust any Rates.

After completing the Booking Entry form, click [Book] to make the booking.
You *may* get offered the chance to confirm the booking to the Client and/or Candidate - depending on your system settings.
| Tip1: Using the All [ ] tick-box at the bottom right will make sure you see all Temps, whether they have any bookings/markers or not. If you do not have this ticked you will only see workers who are booked and/or have any 'Availability' on the planner for that week. |
| Tip2: If you wish to make a booking but have not yet decided which worker you want, ticking the Unfilled [ ] tick-box at the bottom right will display the unfilled row where you can make a booking to add it to the system, and then later choose a specific candidate for that booking. |
Additional Info
From v1.00.24.348 (or later) it is possible to display the booked/timesheeted hrs for a Temp Worker on the Planner. The feature is controlled with parameter PROFESSWB, FLAG(33)
|

iv) Making bookings from a TEMP Vacancy
Go to the Temp Vacancy and select the [Bookings] tab of the vacancy. Click the [Book] button and then Complete the details of the Booking Entry form.
You can use the [Suggest] button at the bottom left of the form to have the system suggest available workers for this booking <or> type the surname / reference number of the worker into the Candidate field on the form.

Having selected a worker click [Book] at the bottom left to make the booking.
You *may* be offered the chance to confirm the booking to the client/candidate depending upon the setup of your system.
3. The Booking Entry Form
However you decide to make a booking you will usually end up in the Booking Entry Form. The purpose of this form is to record WHO wants to book the worker, WHEN they want them, WHAT they will be doing and WHICH worker will be doing the job.

Booking Entry Form Fields
Each of the fields on the booking Entry form are described below:
| Company | Which Client/Company the booking is for. |
| Branch | Which branch of the company (if they have multiple branches) |
| Postcode | The postcode/Location of the site for the booking |
| Contact | The name of the contact at the client who is requesting the booking |
| Role | The ROLE (Job) for this booking |
| No of Bookings | The number of workers required (usually 1, but can be multiple) |
| Book From/Until | The dates for the booking. |
| Shift | The Shift for the booking |
| Start / End | The start/End times for this booking |
| Mins Break | Number of minutes of unpaid break for this booking. |
| P/O Number | The Client Purchase Order No. for this booking (if applicable) |
| Basic Pay * | The candidate Pay rate (This is often pulled in from the Rate card held against the client) |
| Basic Charge Rate * | The client charge rate (This often comes from the Rate card held against the client) |
| Fixed Rates | If you tick this box, then the rates that are entered will be 'Fixed' for the duration of this booking and the system will not attempt to look-up the rates from a rate card, but will remain FIXED at whatever is entered on the booking. |
| Week Control (Mon-Sun) | You can tick specific days on the week control to specify which days will create a booking e.g. If you had ticked, Mon, Tue, Fri then a booking from 03/03/2025 - 23/03/2025 would create 9 bookings (shifts) i.e. 3 bookings each week, on Mon, wed & Fri |
* For Pay Rate/Charge rate, if you overtype these in the booking Entry form they will then become "Fixed Rates". Fixed rates apply to that one booking only, and the next time a similar booking is added it will revert to the 'normal' rates taken from the rate cards. |
Booking Entry Form Buttons
The following buttons exist on the Booking Entry form;
| Button | Details |
| Suggest | Clicking this will suggest a list of available temps who could fulfil the booking(s) |
| Rate Source | Clicking this will display a screen explaining where the Pay/Charge rates have been looked-up from. |
| Detailed Search | This button will open an alternative search screen where users can search for temps with different roles, or specific tick boxes, such as 'Own transport' etc. |
| Calculator | This will display the rates calculator, which can be used to help calculate rates, margins, and see Gross/Nett profit when negotiating rates. |
| Use Pattern | This can be used to select or apply a Booking Pattern Booking patterns can be used to make booking on different times for different days, e.g. Monday DAY Shift 09:00-17:00 Tuesday DAY Shift 09:00-17:00 Wednesday NIGHT Shift 18:00-23:00 |
| Documents | If you have dragged/dropped any documents onto the booking Entry Screen, this button will show and allow you to see all of these documents. |
| NOTE: When attempting to book candidates the system is normally setup so that users will be prevented from booking candidates whose Status is not "LIVE" (or equivalent) This feature can be turned on/off using Parameter RECD, Flag(2). |
| NOTE: Booking Quantity Restricted to One There is a system parameter labelled as TEMPS, FLAG (42) - Set Booking Role to Candidate Role. If set, then this parameter will restrict the number of bookings to "1" within the booking entry screen - since you can only select ONE worker for this booking which will then change to match their 'main' role. |
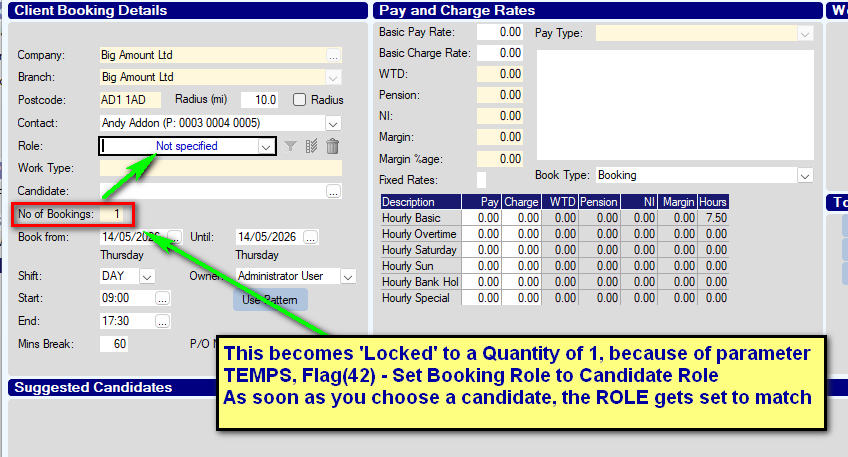
| NOTE: Booking Quantity Restricted to One There is a system parameter labelled as TEMPS, FLAG (42) - Set Booking Role to Candidate Role. If set, then this parameter will restrict the number of bookings to "1" within the booking entry screen - since you can only select ONE worker for this booking which will then change to match their 'main' role. |
4. Selecting or Shortlisting a Temp
When making a booking details as above, you can choose a Worker in one of several ways.
A) Selecting a Temp for a Booking (via the Booking Entry Form)
i) Type the Surname of the worker you want to select, then press <Tab> to choose the worker.
<OR>
ii) Type the Reference Number for the candidate you want to select and press <Tab>
<OR>
iii) Click the [Suggest] button at the bottom left to see a list of possible candidates and then use the Select [ ] column at the right-hand end of the suggestion grid to select the candidate you wish to use.
See below

Having selected a worker, to make the booking click [BOOK]
You *may* get offered the chance to confirm the booking to the client and/or the worker (candidate)
Optional - If you want you can tick the Day 1 Task [ ] box to create a TASK for yourself to pop-up and remind you to call or speak with the candidate on the first day of this booking.
B) Shortlisting a Worker for a Temp Vacancy (and then booking them)
To shortlist a worker for a Temp vacancy proceed as below:
Select the [Candidates] tab of the Vacancy. To add a worker to the page, there are several options:
i) Drag/Drop the CV of a 'NEW' worker (ie not registered in the database) onto the [Candidates] tab. You can add the candidate to the database and then they will be automatically shown on this candidates tab
<OR>
ii) Click [New] at the bottom left - the system will display a simple search screen where you can find a worker based on their Forename/Surname/Role - this is ideal if you know the worker you wish to add.
<OR>
iii) Click [Search] at the bottom left. This will display a search screen where you can looks for workers based on their role, location, sought roles, salary, etc, etc. You can then select several workers and Match then to this job.
<OR>
iv) You can use the 'GROUP' Drop-down at the bottom left, and then click the [Create] button. This will allow you to select a previously created GROUP of workers and match them all to this vacancy.
To book any of the temps that have been shortlisted, go to the [Bookings] tab of the vacancy.
On the bookings tab, use the drop-down to select a candidate, then click [BOOK] to create the bookings for the selected candidate.

Additional Info
From v1.00.24.348 (or later) it is possible to display the booked/timesheeted hrs for a Temp Worker on the Planner. The feature is controlled with parameter PROFESSWB, FLAG(33) |
5. Compliance items with Bookings
When making a booking, the system can check the Compliance items and warn users if there is a problem.
It is possible to setup compliance items on a CLIENT record (i.e. Things that need to be checked before bookings are allowed at a client, such as credit checks, etc.) or against the Candidate for items which are necessary before they are allowed to be booked (such as Right to work, Proof of ID, various certifications or qualifications, etc.)
Example of Client compliance Warning.

In this example, because the 'Credit Check' has not been completed, bookings will be prevented at this client.
Compliance items can be Mandatory or can simply be a Warning. In the case of a mandatory item, clicking [OK] will usually exit the booking.
| Optional: From version 1.00.25.003 (or later) there is an option to display the Internal Booking Text from the client after the compliance warning. This can be activated with parameter TEMPS, Flag(56) Example showing client Internal Text.  |
6. Confirming Bookings
Once you have made some bookings for your registered Temp workers, you will want to confirm these to both parties, i.e. the client they are working for and to the worker themselves.
There are several ways to confirm Bookings. They can be confirmed directly from the Booking Entry Screen or from the Booking tab of the client record. You can also confirm bookings to workers from various view such as the PLANNER, EDIT BOOKINGS or TIMESHEET ENTRY screens. (Using the Macro manager ⚙️ )
System Setup (Parameters)
The ability to confirm directly from the Booking Entry screen is controlled by two system parameters.
PayrollB, Flag (19) Confirm to client on exit (YNMFJ) and
Payroll, flag(47) Confirm to cand on exit (YNMFJ)
The setting on these flags control whether the confirmation is mandatory, only the First time someone is booked at a site, or Job specific. (ie. You are forced to send the confirmation the first time they go there for a specific ROLE - but confirming subsequent bookings for the same role is optional )
| Parameter Setting | Details |
| Y (Yes) | i.e. A prompt to send a confirmation will be offered upon exit. |
| N (No) | Users will not be prompted to send a confirmation upon exit. |
| M (Mandatory) | Users will be forced to send a confirmation upon exit. |
| F (First time) | The first time a candidate is booked to work at that site, it is mandatory to send a confirmation and the user will not be able to skip doing so. For subsequent bookings at that site, it is optional (but not required) to send confirmation. |
| J (Job) | In this case the first time the candidate is booked to do that specific Role (Job) at the Site, then confirmation is mandatory. Subsequent bookings for the same ROLE (at that site) will not require confirmation, but if they are then booked to do a new Role, confirmation for the new role will be mandatory (the first time). |
| R (Requirement) | Every time a worker is booked on a new REQUIREMENT for the first time, it will be mandatory to confirm their booking(s). Subsequent bookings on the SAME requirement will not need to be confirmed. (Added after ver 1.00.17.213) |
| NOTE: When considering 'first' the system looks at the date of the booking. i.e. If a worker were booked to attend site on for the first time on 19th April, then confirmation may be made mandatory. If they were then subsequently booked at a later date to attend site on 10th April, then the system would make it mandatory to send confirmation for this earlier booking since they will attend site chronologically earlier and thus it now becomes their 'first' booking. |
| Note(2): When using the Requirement option the system will only enforce the sending of confirmations if the bookings were made from the "JOB" page of the requirement; Simply adding a worker to the requirement and then booking them onto a Job using the [Weekly] page of the requirement will not enforce the sending of a confirmation |
After version 1.00.18.100 it is possible to specify the default method for the booking confirmations within the macro manager. This is usually E (email) but can be S (SMS) or even L (Letter).
i) Confirm to Client/Candidate from Booking Entry Screen
Having made a booking, via the Booking Entry Screen, when clicking [Book] you will be offered the chance to confirm the booking to the Client and/or Candidate (worker).

| From v1.00.25.045 or later, it is possible to send a calendar invite along with the booking confirmation. This feature only works with booking confirmations sent off the back of the booking entry screen, and only for a single worker. It does not work with the macro manager, or with booking sent from other locations. NEW PARAMETER(S) PAYROLL - Flag 62 - Calendar Invite on Cand Booking Confirm (Also relies on PAYROLLB Flag 52 for default email ) ENIGMA - Flag 45 - Calendar Invite on Cand Interview Confirm (Also relies on RECF Flag 3 for default email method)
PAYROLLB, Flag(27) must also be UN-Ticked (ie NOT using Macro Manager for Booking Confirm) |
ii) Confirm to Client/Candidate from Booking tab of Client
Go to the Bookings tab of the client and select the worker(s) and date range you want to confirm; then click [Confirm] at the bottom left of the screen.

The system will then open a booking confirmation screen where you can confirm these bookings to each party.
Click an Individual candidate email - to confirm the booking to the chosen candidate
Click the Contact email icon ✉️ - to confim the bookings assigned to the chosen contact
Click the Macro manager ⚙️ - to send all the candidate booking confirmations as a batch (via the Macro Manager)

Confirming Multiple Bookings (Schedule)
It is often useful to be able to confirm a list of upcoming bookings to a worker. If you wish to confirm a booing schedule to a worker showing their bookings over the coming weeks, this is now possible.
After version 1.00.19.080 it is possible to use the summary View within bookings (Temp Centre) to confirm multiple bookings to candidates.
How to confirm Multiple bookings from Booking Schedule
Select the TEMP CENTRE, and then choose the [VIEWS] workbench.
Choose the SUMMARY style of view and set a date range.
This will display a list of all temps who have working time bookings between the specified dates. (See below)

Once you have a list of all the candidates with bookings between the chosen dates, you can then click the Macro button and pass the email addresses into the macro manager.
See below

From here, you can choose a CALL TYPE, and then apply a template.
The template can show a list of ALL the bookings for each candidate within the chose date range.
SMS Replies to Booking Confirmation (Optional)
From version 1.00.20.153 (or later) it is possible to send an SMS message to a candidate with details of their booking. Replying to this message with "OK#" or "NO#" can update the status of the booking, where # is the day number on which the booking occurs.
e.g. A Worker may receive an SMS such as
"You have a booking at ABC Supplies on 03/06/2020 at 09:15
To accept the booking reply with OK3 or to reject send NO3"
Sending the reply OK3 will update the status of the booking.
| NB: Sending 'OK' with no date specified will first attempt to update a booking on the day after the reply is received, and if no booking is found will then try to update a booking on the same day the SMS reply was received |
Parameter TEMP, Text(18) controls which Status the OK/NO replies will set the booking to.
| NOTE: In order to use the SMS reply feature you need to have the SMS text integration active on your system using our preferred SMS partner - Firetext. |
7. Viewing Bookings
Having booked your workers to go to various clients on different days, you will want to view these bookings. There are lots of ways to view booking within the system.
i) View Bookings on Client
Go to the [Bookings] tab of the client, and you can see bookings, set a date range and filter for a specific worker, role or contact. The purple arrows ⬅️➡️ can be used to flip fwd/back through weeks.

It is possible to Confirm bookings from here by using the [Confirm] button and then sending confirmations to workers and/or contacts.
ii) View Bookings on Candidate/Worker
From the [Bookings] tab of the worker you can view their bookings in a selected date range.
The purple arrows ⬅️➡️ can be used to flip fwd/back through weeks.

Details of bookings can be exported to excel, or displayed as a ROTA.
iii) View Bookings on PLANNER
From the [Planner] you can view bookings in a visual style. showing details of the client, start/end time, type of booking etc.
This view is particularly useful to see when candidates are working, who is available on certain days,
Again, it is possible to email workers directly from this screen using ✉️ icon

The Palette below the planner allows user to easily add availability markers or even make bookings.
The planner can be exported to MS Excel using the toolbar icon. (Will require an export password.)
From release 1.00.26.041 or later, there is a hover-tip on the worker surname that shows the "Last Booked Date" (prior to "Today"). The feature is activated/de-activated with parameter PLANNER, Flag(9)
iv) View Bookings using [EDIT BOOKINGS]
The [Edit Bookings] view is a particularly useful & flexible view for bookings. You can sepcify a date range and also focus in on Filled bookings, Un-Filled Bookings or 'All' bookings.

The [Edit Bookings] view allows access to export bookings to Excel in a variety of layouts. By filtering to a specific client it is possible to send Confirmations from this screen to the workers and/or contact at the chosen client.
v) View Bookings from VIEWS / TOOLS
The [VIEWS] workbench allows users to see bookings displayed in a variety of styles. There is a Summary style, a Detailed style (showing 1 row per shift) and a Bookings style showing slightly different info about each booking.

The Summary style is particularly useful when viewing bookings as it shows the 'End date' for bookings so you can easily spot which workers are coming towards the end of their current bookings and perhaps you need to talk to the client about extending the booking.
8. Bookings Maintenance
From time to time details of the bookings will change, so you will want to manage or change the details of existing bookings. This includes things such as changing the start time / end time or swapping the worker for a different worker.
Replacing a Booked Candidate with another
Find the original vacancy and select the [Bookings] tab and then select the 'Action' sub-page.
Use the drop-down menu to choose REPLACE and then select the candidate to replace, and the candidate to replace them with, and the date range for the replacement. Click [Execute] to make the change.
| TIP: There are other actions that can be done using the same page - SWAP allows you to SWAP the bookings for two candidates who may be job-sharing, e.g Mary will do Sally's days and vice versa. - REMOVE Allows you to remove a particular candidate from a range of bookings, but leave the bookings there as "Un-filled" - DELETE deletes all the bookings for the chosen candidate within a specified date range at this client. e.g. [ Replace ] [Fred Smith ] with [Martin Jones ] From: 01/05/2012 to: 19/07/2012 |
Click the [Execute] button to replace the candidate between the selected dates.
| Note: After you’ve swapped a candidate, you may want to go back to the ‘Filter’ page, and then re-use the [Confirm] button to send confirmations to the client, and the new candidate. |
Optional
The ‘Action’ page allows several other actions on the entire ‘set’ of bookings; you can DELETE all the bookings, REMOVE a candidate (which will leave a set of unfilled bookings) or SWAP one candidate with another.
(e.g. If FRED did Mon/Tue/Wed and Harry was going to do Thur/Fri, you could SWAP them, so Harry does Mon/Tue/Wed, and Fred would then do Thur/Fri )
9. Changing the Branch for a Booking (Unallocated Branches)
Normally, once a booking has been made at a particular branch/site of a client, then it is locked to that branch and the branch cannot be changed. However for special situations there is a new facility for 'Unallocated branches'.
(Available from verersion 1.00.25.079 or later, March 2025)
If a booking is made at the specific Unallocated Branch for a client, this branch can then be changed at a later date and the booking moved to one of the 'Real' branches.
e.g. This is useful in medical scenarios where you may have a contract to fill or staff certain departments or wards in a hospital, and know which staff will be sent but not specifically which treatment room (yet) they may be working in.
i) System Setup to use an Unallocated Branch
| Parameter CMS2, Text(5) Site Type for Unallocated Site | This parameter holds the code value to be used for an unallocated site (typically set to UNA) |
| Code Table CMS Site Type [127] | The site type specified above must be added to this code table to allow you to set this when adding any 'unallocated' branches. |
ii) Adding an Unallocated Branch to a Client
To add an unallocated branch, go to the client record, click the Branches icon, and add a new branch. Ensure the Branch type is set to UNA - Unallocated

iii) Swapping the Branch on a Booking
Provided the Booking has been made at the un-allocated branch, then when you open the booking you will be allowed to choose a new/different branch, and the booking will be moved to that branch instead.

iv) Clarifications/Limitations for bookings made at an Unallocated branch
Although bookings at an unallocated branch can be swapped to another 'real' branch at a later date, there are some IMPORTANT limitaitons for these bookings.
1) Booking at an unallocated branch will NOT be exported or send to 3rd party products such as Timesheet portal or other online timesheet systems. This is because the booking is not 'REAL' yet - so until a real branch is chosen, the booking is not sent, even if it is confirmed to the client/worker.
Once the booking is moved to a real branch, you should re-send any confirmations to client/worker to ensure that the booking gets sent exported to 3rd party providers, such as Timesheet portal (if being used).
2) It is NOT possible to enter timesheet information against these bookings within Influence.
Any booking made at an unallocated branch will not be displayed within TIMESHEET ENTRY in your Influence Database.


Was this article helpful?
That’s Great!
Thank you for your feedback
Sorry! We couldn't be helpful
Thank you for your feedback
Feedback sent
We appreciate your effort and will try to fix the article