OVERVIEW
From version 1.00.23.352 or later a new Compliance Chase module has been introduced. (We recommend that your system is updated to version 1.00.24.032 or later if you plan to use the feature)
This module allows users to setup sequences of emails that will be used to chase certain compliance items. Users can specify which items are included in the chase, how many days there will be between each chase email, and the candidate Statuses and/or Roles that will be considered for the chase. It can also be used to chase referees to return references (provided the references have been setup as compliance items).
Contents
.
TABLE OF CONTENTS
- OVERVIEW
- 1) SYSTEM SETUP / PARAMETERS
- 2) CONFIGURING A NEW CHASE
- 3) SETTING THE EMAIL SEQUENCE FOR A CHASE
- 3a) Chase Candidate for missing References
- 4) RUNNING A COMPLIANCE CHASE (How to use this)
- 5) HOW TO END A CHASE SEQUENCE
- 6) REFERENCE CHASING
- 7) USEFUL COMPLIANCE CHASE EMAIL MERGE FIELDS
- APPENDIX: Example Chase Emails (Templates)
- Example email1: Chase new applicants for all the required items (Even if sent already)
- Example email2: Chase New applicants for any items they've not yet sent
- Example Email3: Re-Chase applicant for Items they have not send yet
- Example Reference Chase 1: Chase a Referee to send back a reference
- Example Reference Chase 2: Re-chase a referee to send a reference back.
- APPENDIX 2: Worked example of chase email for expired items only. (Inc. email template )
1) SYSTEM SETUP / PARAMETERS
In order to control the new module, there is a new parameter set - COMPCHASE
Details are shown below.
| PARAMETER | DESCRIPTION |
| COMPCHASE, Priority (1) | Priority level needed to be able to setup a new CHASE sequence (This can be replaced with a UAC to provide a specific list of users who should be able to create new CHASE sequences.) |
| COMPCHASE, Text (1) | Call Type for Compliance Chase Journals (Default is CMPL) |
| COMPCHASE, Text (2) | Call Type for Reference Chase Journal (Default is CMPL) |
| COMPCHASE, Flag(1) | Selection of Consultant is Mandatory (Tick to make this mandatory, if required) |
| COMPCHASE, Flag(3) | Show stage on Reference Chase. Tick this to show the "Stage" of a compliance item on the list of people within the reference chase. |
| COMPCHASE, Flag(2) Reference Chasing from Original email | This flag is only applicable to Reference Chasing When set, it allows the system to Re-Send the original email that was manually sent as the 'first' chase to a referee. |
These parameters should be set, and can be accessed from Maintenance > Setup > Parameters
Tip: If you do not have the Call Type CMPL in your system, you will want to add this (or change COMPCHASE, Text (1/2) above.) To add a new Call Type go to Maintenance > Setup > Code Tables, select system area as C - Contact Management and choose code table Call Type [019] - then add a new CODE / Description. |
2) CONFIGURING A NEW CHASE
To configure who and what to chase, there is a new option found in Maintenance > Setup – Compliance Chase Configuration.
(The option can also be found by going to ADMIN > [Cmpl Chase] and then clicking the [Setup] button)

- Expired & Expiring Items
| From version 1.00.25.259 or later, there is a new option labelled Expired & Expiring Only [ ] The feature is optional, and is activated with parameter COMPCHASE, TEXT(4) which must be ticked. If ticked, then the chase will only take into account items that the candidate has already submitted, and are already ticked on their compliance page.  Example A nurse might have sent back her DBS Form, her Vaccination Certificate, and her BLS Forms (as well as several other training certificates). She has never submitted an 'Advanced Life Support' form, because it is not needed for her role. When sending the CHASE email, the system will ONLY list/chase the previously submitted forms (ie DBS, Vaccination and BLS) but not the 'Advanced Life Support', since it has never been submitted in the first place. This feature is useful for chasing existing, registered workers who have previously supplied documents and are out and are working, but where things are going to expire soon, or have already expired. Only available if your system is on version 1.00.25.259 or later.5 |
Once the Compliance Chase Setup screen opens, you can click the [...] button to specify a CODE and enter a Description for your new chase sequence.

Having given the sequence a CODE/Description, there will be several [Tabs] below which you can use to configure the details for this particular chase sequence.
i) The [Templates] tab
The first “Templates” tab allows the user to select the templates to use for each run and the number of days to wait between each run. The templates can be selected by the dropdowns, which are based on a new “Where” type on the template of “CCH – Compliance Chase”. Pick and Edit options have also been provided as seen on Journals and Macros.

When designing your chase sequence use the drop-down to select the email template to send using the drop-down or click [Edit] at the right-hand end to create a new email template to be used.
{Adding/Editing templates is done in the same way as you would create any other email template. Our support article Edit or Create an Email Template explains more. }
Tip: When designing templates for chasing a new Multiline parameter for Compliance has been added - CHASE. This will select only compliance items included on the [Compliance] tab of the chase you are creating.
This would produce an email similar to the one below. The Compliance Items listed would be any of those which were specified on the [Compliance] tab of the chase sequence that you setup.
|


ii) The [Compliance] tab
The [Compliance] tab details the compliance items to check. These can be whole groups (on the left) and/or individual compliance items (on the right).
There is a tickbox to the right of each item “RptDays”. If ticked, this indicates that the system should use the reporting days on the item to determine if the item is expired or near expiry.

Having selected the items you want to chase, click [Apply] to save your changes and then move on to the next tab.
ii) The [Filters] tab
The [Filters] tab sets some of the search parameters for the chase run. Candidate status and or roles.

Once you have decided which candidates you want to target with this chase sequence (based on their ROLE(s) and Statuses, click [Apply] to save your changes, and move on to the next tab.
iv) The [Send Log] tab
The final [Send Log] tab shows the log of emails sent.
Double clicking on an item in this list will open the associated Journal record.

This tab is useful for seeing what has been chased and when it was chased.
Once done, click [OK] to exit this tab and close the chase sequence.
Reference Chasing [ ] {Optional}
Putting a tick in the Reference Chase [ ] box makes the chase into a reference chase. This will look through for “RF” (Referee) type compliance items where the referee has been set but the compliance item has not been ticked - i.e. the reference has not been received from the referee.
In the same way as compliance chasing, there are a number of templates that are used with a number of days specified for each chase.
NOTE: The “Compliance” tab is hidden as only the “RF” type compliance items are used.
When running a chase, the emails are sent to the relevant referees and not to the candidates as would be the case with a normal compliance chase.

| NOTE: When designing an email to chase referees to return a reference, the Merge Field that you will want to use in the template email for the referee name is [[CMC2_FORENAME$]] e.g. Hi [[CMC2_FORENAME$]] We have been asked to contact youto provide a reference for [[ENID_FORENAME$]] [[ENID_SURNAME$]], who is applying for work via our agency. We are required to take up references, etc etc. |
3) SETTING THE EMAIL SEQUENCE FOR A CHASE
In order to chase the compliance items, you will want to setup various emails to send out at different stages. You might have an initial chase email, a follow-up chase, and then a Final Reminder each of which is worded differently.
Step 1: Click the [...] button and pick a chase sequence that has been setup (or click [Setup] to create a whole new sequence.)
Having done that, select the [Templates] tab and choose the 1st Template using the drop-down.
{If no templates are available, click [Edit] to open the Template Editor and design a suitable email template for chasing.}
Step 2: Specify how many days should elapse form the time the 1st template was sent until the 2nd template is sent, and set this using Days Until. Then use the drop-down to select a template to use for the 2nd email.
{Again, if no suitable template exists, you can use [Edit] to open the template editor and design a suitable template for this second chase.}
Step 3: Repeat the above, for as many chases as you want to create, specifying the number of days that must have elapsed since the previous chase, and then selecting (or creating) a suitable template.

Step 4: Decide how you want to finish the sequence;
If you want the sequence to STOP, then you must choose *** DO NOT SEND ANY MORE EMAILS *** as the final item of your sequence. (See below)
If you do not do this, then the system will continually send the final email of the sequence to the worker, until they no-longer match the group being chased (e.g. You change their status to one such as 'Archived' and do not chase these people or they send all the requested items.)

Creating the Email Template
If you need to create an email template for any of the steps above, this can be done as below.
{NOTE: Adding/Editing templates is done in the same way as you would create any other email template. Our support article Edit or Create an Email Template explains more. } |
STEP (i): Click the [Edit] button to open the Template Editor
STEP (ii): Give the template a Description (bottom left), and a Subject (bottom centre)
Set the Modify & Display priorities (top right) to determine which users can amend the template or see/use the template.
Also decide if the template should be personal (your use only) or shared (visible to all users - provided they are of high enough priority)
STEP (iii): Use the large white area to create the content of your template. Write the email as you want, and use the Catalogue at the left hand side of the screen to choose relevant merge fields such as Candidate Forename, etc.
See below for example email template.

Tip: When designing templates for chasing a new Multiline parameter for Compliance has been added - CHASE. This will select only compliance items included on the [Compliance] tab of the chase you are creating.
This would produce an email similar to the one below. The Compliance Items listed would be any of those which were specified on the [Compliance] tab of the chase sequence that you setup.
The email can then be sent from Outlook, just like any other email. |
Compliance Chase Merge fields
When creating your template you will want to include a list of items that you want to chase. Below are listed some useful examples of fields to include in your template:
i) Field to list all items included in the Chase.
If you want to include a merge field to list details of all the ITEMS which are included in this chase sequence, as specified on the [Compliance] tab, use the field below:
[[MULTILINE=COMPLIANCE;CHASE]] [[RQDF_REQ_CODE$]] [[RQDF_DESC$]] [[/MULTILINE]]
Tells the system to build a list containing all the items which were specified on the [Compliance] tab of this chase, irrespective of whether they have been received or not. This is often useful for the initial email to make candidates aware of all the documents that are required for their registration.
ii) Field to list all "Non-Compliant" items included in the Chase.
If you want send a list that includes only items which are "Non-Compliant" from those included as part of the chase (e.g. have expired, have not yet been returned, or are not yet ticked for some reason) then use the field below:
[[MULTILINE=COMPLIANCE;CHASE;COMPLIANT=N]] [[RQDF_REQ_CODE$]] [[RQDF_DESC$]] [[/MULTILINE]]
This will include only items where they have not yet been received/marked as completed, {i.e. not ticked on the candidate as being compliant} or have Expired.
Items which have been marked as N/A (right-click and show red X) will not be chased.
Considerations when Designing a Chase SequenceWhen you design a chase, it is the chase sequence itself that defines what gets chased, and so it is important to think about the ROLES and Compliance Items included on the chase. For example, if you recruit both Nurses and Social Care workers then these people may have different Compliance items that are required. If that is the case, then you will want to setup a separate chase sequence for Nurses, which specifies all the items that they are required to supply as part of their registration, and a separate chase sequence for Social Care workers, requesting/chasing different documents needed by them. By doing this, you can (often) use the same chase email since the merge field will only pick-up what has been specified on the chase. This means that the same template might produce different emails when used with different chases, since it is the chase itself that determines what items are listed. Example: One template might produce both these emails depending upon the chase that it is used with. e.g. When chasing a nurse, it might produce the email below.
Whereas using the same template email on a chase designed for Support workers might produce a different email as below (because the CHASE specifies different items as being required)
|


EXAMPLE COMPLIANCE CHASE EMAIL
Below is an example of an email for chasing compliance items - This can be used for any compliance chasing, since the chase itself determines what is actually listed.
For example: The template as below Hi [[ENID_FORENAME$]] As part of your registration, we require the following documents from you. Please attach by return Documents required [[MULTILINE=COMPLIANCE;CHASE]][[RQDF_DESC$]] [[/MULTILINE]] Thanks for your prompt attention |
This will produce an email something like the one below
 |
3a) Chase Candidate for missing References
From v1.00.26.031 (or later)
It is now possible to setup a chase email to send to Candidates, and send them details of the names of any referees (as recorded on their [Compliance] tab) who have not yet returned the requested reference.
STEP (i): Find the names of the compliance items setup as 'Reference' on the [Compliance] tab of the worker. (These are usually Ref1, Ref2, Ref3, etc. but may be different on your system depending what you chose to setup)

STEP (ii): Setup your email to send the the candidate/worker.
You will want to include a merge field to list any of the "references" (compliance items) which have not been returned, and show the name of the Referee
The field you need is shown below (Just replace VALIDCODES=xxxxxxx with the relevant Compliance item codes for your references, often Ref1, Ref2, Ref3, . . . etc. )
STEP (iii): Send the email to the worker. (either individually, or as part of a compliance chase sequence, or using the "Macro manager" to send it to multiple workers.) - See below.

4) RUNNING A COMPLIANCE CHASE (How to use this)
Compliance Chasing can be found as an option under Reporting Tools as well as a button on the Admin workbench. i.e. Admin > Cmpl Chase

Select the Chase from the dropdown. Select any additional filters that may be required (working between dates, candidate registered dates, consultant and work type tick box) and then press the [Search] button. (Bottom right)

All relevant candidates will be selected - i.e. any candidate that has at least one of the compliance items outstanding or expired or expiring for a compliance chase. The compliance items are listed in the same way as a RAG report. There is an “Incl” column that can be used to untick any listed person.
If there are any candidates listed that you do not wish to send an email to, you can click on the green ✅ in the [Inc] column and change it to a cross. ❌- there will not be included when you send the batch of emails.

For candidates that have items outstanding, have had an initial chase email sent but are not yet due the next email, they will be initially listed, but with an ❌ in the “Incl” column. The ❌ can be changed to a tick ✅ if required by simply clicking on the icon so that the next email can be sent ahead of time.
If the candidate does not have an email address, then there will be a yellow warning triangle displayed in the “Incl” column. Floating over the triangle will show the reason.
Next to the [Send] button is the signature selection button to allow the correct signature to be used.
The SMTP for bulk emailing only flag on the user is taken into account. If set, then the user will have the option to use SMTP to send the emails.
Testing the Chase Sequence
So that tests can be done, before firing off all emails, there is a Test Quantity [ ] field. The number entered here will allow the “Send” to create (but not send) the emails one at a time so that the email can be checked.
{i.e. The emails will be generated and passed to MS Outlook, but will not be automatically sent)
When running a TEST, the user is asked for each one whether or not to log the email as sent.
Example of a Test Run
If you choose to run a TEST, you can specify the number of test emails to be passed to MS Excel.

After each email, the user will be asked if they wish to register it as SENT or not.
(If you did not send the email, you will probably want to say 'No'.)

Any emails which were marked as SENT have this indicated with the email icon. ✉️

| NOTE: If you are using a Multi-Office system where you choose a specific Office when logging into the database, then by default the chase will only run for the office you are currently logged in to However - there is an option to run a chase for All offices [ ] which can be found at the bottom right of the chase screen - see below.  |
5) HOW TO END A CHASE SEQUENCE
When setting up a chase sequence, you can determine what happens when the system reaches the last email of the sequence.
Either;
a) The system can continue to send the final email periodically and keep chasing for the required documents
<or>
b) You can specify that once the system reaches this point, it should not send any more emails.
In the example below, you can see that the system will send Chase 3 three times, and will then stop sending that email.

6) REFERENCE CHASING
NOTE: From version 1.00.24.045 or later, there are two modes for Reference chasing - Standard Mode or Resend Mode In general there is very little difference between Compliance and Reference Chasing. If the chase selected from the dropdown is a reference chase, then the search results show the referee name instead of the RAG (Red/Amber/Green) Compliance information and emails will be sent to the referee rather than the candidate. Standard Mode allows the user to setup up-to 10 email templates to chase for references (similar to compliance chasing.) Re-Send Mode allows users to manually send an initial reference chase email, selecting the documents/forms they wish to send, and then subsequently Re-Send mode is a system-wide setting, and is activated with parameter : COMPCHASE - Flag 2 - Ref Chasing from Original Email |
| When running a reference chase, you can use COMPCHASE, Flag(3) to display the "Stage" next to any of the referees. This 'stage' from the compliance item is often used to indicate the type of reference they are providing (e.g. Academic, Character, Professional) |
IMPORTANT: In order to be able to use the Reference Chase feature, you must have compliance items setup for 'Referees'. On the Compliance tab of the candidate/worker record you need these specific Referee items. You click the item to add the details of the referee (Name, telephone, mobile, email address, etc.) and it is this email address that is used to chase the referee for their reference. When they complete & return the reference form, it can be dragged/dropped against this compliance item, and then ticked-off as Complete. (See below)
|

Reference Chase Setup
When setting up a Reference chase, you will want to click the [Setup] button.
Within the Chase Setup Screen, you can setup Filters and Templates

| FILTERS | You can specify the Candidates Statuses & Roles that are applicable to this chase. |
| TEMPLATES | You can create the emails that will be sent to the Referee asking them to send back a reference for the candidate. |
IMPORTANT: When designing the Reference chase template, if you want to add the referee name, you need to use the 'Contact' field, but it must be adjusted to contact 2 i.e. [[CMC_FORENAME$]] would need to become [[CMC2_FORENAME$]] to display the Referee Forename. |
EXAMPLE REFERENCE CHASE EMAIL
Below is an example of an email for chasing Referees
Dear [[CMC2_FORENAME$]], I emailed you a few days ago, requesting a reference for [[ENID_FORENAME$]] [[ENID_SURNAME$]] who provided your name as a referee. I know that you are probably very busy, but I would be most grateful if you could spare a couple of minutes to send in a reference for [[ENID_FORENAME$]]. I am looking forward to hearing from you shortly. Thank you. |
This will produce output something like below
 |
i) Standard Mode (Available from v1.00.24.032, 2nd Feb 2024-> Onwards)
When running in Standard Mode the system will allow you to setup up-to 10 x email templates that can be sent to the Referees defined on the [Compliance] tab of the candidate.

Simply define and add templates in exactly the same way that you would for a compliance chase.
When setting up the chase be sure to tick Reference Chase
| From v1.00.25.030 or later, the Reference chase results grid will show the "STAGE" associated with that particular reference item from the [Compliance] tab on the candidate - *if* stages have been used. |
ii) Re-Send Original Mode (Available from v1.00.24.064 or later, 5th Mar 2024-> Onwards)
This newly introduced method of working allows users to manually send the first reference request to a referee, and then to subsequently re-send the same template (with the same attachment, etc) using the chase mechanism.
(This is useful for situations where it is necessary to send specific types of reference request, depending upon the ROLE or Qualifications of the worker. For example, in the Education sector you might send a different type of Reference request on behalf of an NQT (Newly Qualified Teacher) than for a TA or a long-term qualified teacher.)
When using Re-Send Mode, the number of REFERENCE chase emails allowed will be reduced to 5 (max) -
BUT the system will allow the user to Re-Send a particular email, including a specific attachment.
| HOW IT WORKS STEP 1: Go to the worker, select the [Compliance] tab and click to add the name of the referee. STEP 2: You can now manually send an email to the referee requesting the reference. This can be done in a couple of ways: a) Click to open the referee record. Once the referee page has opened, click on the email icon and write/send an email, and attach any document you wish them to complete. <or> b) If you have a Matched Pair of Compliance items setup, where you have a 'Ref. Request' followed by a Referee, then you can click the small MS Word icon to generate a reference request form and automatically send/email this to the referee immediately below.  STEP 3: Having manually sent the first reference request email plus any relevant document/form, you can now use the Reference Chase module to chase or re-send these emails. Within the chase definition, be sure to tick Reference Chase [ ] so the system knows that this is a reference chase. You will be able to setup up-to 5 chases, and can tell the system to re-send the previous request (along with any documents that were attached) - Just choose ** RESEND ORIGINAL REFERENCE REQUEST *** as the Template. NOTE: When re-sending previous requests, the Subject field can be used as a way to amend the subject of the email, whilst retaining the same content as the previous email. The Subject can contain merge fields such as [[ENID_FORENAME$]] to merge in the name of the candidate to whom the request refers. see below for Example.  The 'Days Until' is used to specify how long the system must wait before sending the next email in the sequence. |
iii) Chase only mode (Manual Send original - then chase)
Available from v1.00.26.165 or later, 20th June 2026-> Onwards)
This newly introduced method of working allows users to manually send the first reference request to a referee manually and then have the system send subsequent CHASE emails.
The new feature to "Chase only" rather than actually 'sending; the initial chase, is available when setting up the chase. Just choose Manual Original - you can then setup various chase emails (Up to a maximum of 5)
See below
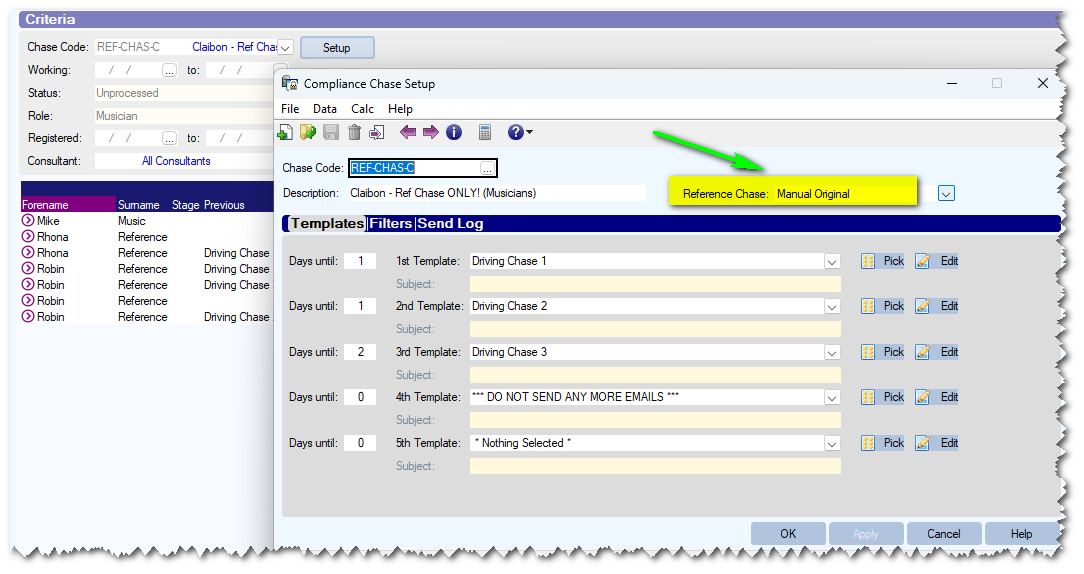
The new feature is only available if using the "Re-send original" style of reference chasing. (Activated with parameter COMPCHASE, FLAG(2) ). It can also check for a specific type of email being sent to the referee or 'any' email sent to the referee for the specific candidate (Specify the call type to check for using parameter COMPCHASE, TEXT(5) )
| PARAMETERS | DETAILS |
| COMPCHASE, FLAG(2) Ref Chasing from Original email | This parameter needs to be ticked to use the "Chase Only" style as above. |
| COMPCHASE, TEXT(5) Call type to check for First Reference Sent | Use this to specify the CALL TYPE that must have been sent to the referee. The system will not start chasing people until a call of this type has been (manually) sent to the referee on behalf of the candidate. |
7) USEFUL COMPLIANCE CHASE EMAIL MERGE FIELDS
When designing emails to chase Referees and asking them to send back completed references, the following merge fields may be useful.
| Description | Merge Field |
| Referee Forename | [[CMC2_FORENAME$]] |
| Referee Surname | [[CMC2_SURNAME$]] |
| Referee Email | [[CMC2_EMAIL$]] |
| Referee Mobile | [[CMC2_MOBILE$]] |
| Referee Telephone | [[CMC2_PHONE$]] |
TIP: When designing your chase template email you can select these fields from the Contact Management Contacts section of the Catalogue, double-click to inset them into the template and then just edit [[CMC_.....]] and change it to [[CMC2_.....]]

APPENDIX: Example Chase Emails (Templates)
Below are some example templates that can be used for chasing compliance items. If you wish to use these simply copy/paste the blue text from below into the 'Chase' email on your system, You can then modify the wording to suit.
Example email1: Chase new applicants for all the required items (Even if sent already)
Chase 'New Applicants' for all items specified in the chase sequence.
Hi [[ENID_FORENAME$]]
Thank you for registering with us. As part of your registration we need the following items.
Items required
[[MULTILINE=COMPLIANCE;CHASE]][[RQDF_DESC$]]
[[/MULTILINE]]
Please send at your earliest convenience
Example email2: Chase New applicants for any items they've not yet sent
Chase 'New Applicants' for any items specified in the chase sequence that have not yet been returned/marked as 'complete'
Hi [[ENID_FORENAME$]]
We recently asked for some items as part of your registration. We are still awaiting the following items.
Items not yet received
[[MULTILINE=COMPLIANCE;CHASE;COMPLIANT=N]][[RQDF_DESC$]]
[[/MULTILINE]]
Please can you send these at your earliest convenience.
Example Email3: Re-Chase applicant for Items they have not send yet
'Final' chase for 'New Applicants' for any items specified in the chase sequence that have still not yet been returned/marked as 'complete'
Hi [[ENID_FORENAME$]]
We urgently need the following compliance documents to complete your registration. Until we receive these we are unable to offer you work
Items Urgently Required
[[MULTILINE=COMPLIANCE;CHASE;COMPLIANT=N]][[RQDF_DESC$]]
[[/MULTILINE]]
Please send at your earliest convenience; If you have any queries please contact us.
Example Reference Chase 1: Chase a Referee to send back a reference
This email can be used to contact a Referee, and ask them to send back the completed reference form on behalf of a candidate.
Hi [[CMC2_FORENAME$]],
We have been asked to contact you by [[ENID_FORENAME$]] [[ENID_SURNAME$]] who is in the process of apply for work through us.
Please can you complete the attached Reference Request form, and return it to us at your earliest convenience.
Many thanks
NB: Don't forget to amend the template and attach the empty 'Reference Request' form that you wish to be completed.
Example Reference Chase 2: Re-chase a referee to send a reference back.
This chase can be used to chase a Referee again, and ask them to send back the completed reference form on behalf of a candidate.
Hi [[CMC2_FORENAME$]],
A little while ago we contacted you asking for a reference for [[ENID_FORENAME$]] [[ENID_SURNAME$]].
We still have not received this.
Please could you get this back to us at your earliest convenience, as we will be unable to complete the registration for [[ENID_FORENAME$]] until we receive this.
Many thanks
NB: Remember to attach the relevant Reference Request form to the template if you want to re-send the form to the referee..
APPENDIX 2: Worked example of chase email for expired items only. (Inc. email template )
Below is an example of how you might setup a chase sequence that can be used to chase workers who are already registered and have previously submitted all the necessary paperwork, but where some things have now expired (or are near expiry)
Clarification re: Expired & Expiring Items chasing It is only chasing for items that they've had or sent before, that have now expired. It does not chase for 'missing' items. e.g. If a worker has sent their Right to Work, Proof of ID, driving licence, and several healthcare 'Training' courses before, then if one or two of the courses have 'expired' it will chase them for up-to-date versions of those courses. BUT. . . If a worker had NEVER sent their DBS, then this particular type of chase would not chase them for the missing DBS certificate. Because they have never sent it, it is not "Expired or Expiring" and hence this type of chase does not ask for it, |
STEP 1: Setup the new chase
Ensure the feature is activated, using parameter COMPCHASE, TEXT(4) which must be ticked.
Once active go to ADMIN > CMPL CHASE -> [Setup] and create a new chase.
e.g. Chase Code WORKERDOCS
Description Chase Workers for expired/nearly expired docs
On the [Compliance] tab, select every section of compliance (except References! ) Then click [Apply]

| NOTE: If you want to chase 'near expiry' items, then you will need to tick the [RptDys] column for any GROUP of items where you wish to apply this check. |
STEP 2: Create the chase template (email)
Now choose the [Templates] tab of the case. Click the [EDIT] button next to 1st Template
Copy the following text into the large white template area. (Repeat for 2nd Template, 3rd Template etc, if you want.)
Hi [[ENID_FORENAME$]] Please can you re-supply copies of the following documentation/items which you have previously supplied to us. These documents have either expired or about to expire. Expired Items [[MULTILINE=COMPLIANCE;CHASE;COMPLIANT=N;EXPIRES=X]][[RQDF_REQ_CODE$]] - [[RQDF_DESC$]] (Expiry Date: [[RQIN_EXPIRY_DATE]] ) [[/MULTILINE]] Items Near Expiry [[MULTILINE=COMPLIANCE;CHASE;COMPLIANT=Y;EXPIRES=E]][[RQDF_REQ_CODE$]] - [[RQDF_DESC$]] (Expiry date: [[RQIN_EXPIRY_DATE]]) [[/MULTILINE]] Please get us this information at your earliest convenience Many thanks |
Here's what it should look like.

STEP 3: (Optional) Filter the chase for LIVE workers only
If you want, choose the [Filters] tab. You might want to restrict the chase to only "LIVE" status workers - See below.
When done click [APPLY] then [OK]
STEP 4: Run the Chase
To actually run and send the chase emails, go to Admin -> Cmpl Chase
Select the Chase Code, and remember to tick the Expired & Expiring [ ] option.
{Optional} you might want to set the Working (From/To) dates.
Then click [Search] (bottom right)

Finally, once the list of candidates is displayed, you can either choose to TEST some (by setting a Test Qty - top right) <or> You can actually send the chase by using the [Send] button
This will then send an email to each listed candidate, chasing them for any items they have previously submitted which have now expired, or are nearly* expired. (* To work out if an item is Nearly Expired the system looks at the compliance setup and checks the 'reporting days' for that item)
An example of a chase email is shown below.

Was this article helpful?
That’s Great!
Thank you for your feedback
Sorry! We couldn't be helpful
Thank you for your feedback
Feedback sent
We appreciate your effort and will try to fix the article